“What’s in your bag?” seems to be an often asked question.
Typically, this question means “What do you have that I can lust after?” or “What do you have that isn’t as good as what I have?”, but it also has another connotation.
Of course, the gear is important, don’t let anybody ever tell you otherwise, but it’s not about having “the best” camera, lenses or flash equipment, it just means you need the right ones for the task at hand.
But what about the other stuff?
There are so many things that, while not absolutely required, make life a whole lot easier during a shoot, and they’re often ignored when “the question” is asked.
I’m going to compose a series of posts that will attempt to address some of those things. I suppose this could be considered “Part 1”, and I’m going to talk about some of the various ways my iPhone (but it applies equally to Android) has become an essential part of my kit.
Since first getting an iPhone about four years ago, I’ve found that it just becomes more and more useful as time goes on – to the point where I’d still happily take it along with me on a shoot even if I wasn’t actually using it as a phone any more. It’s become a permanent part of my kit.
In fact, my old iPhone 3Gs still gets charged up the night before a shoot, and taken in the bag as a backup, despite now owning a newer iPhone as my actual phone.
Let’s look at some of the reasons why!
Depth of Field Calculator
So, what’s the point of a depth of field calculator? Can’t you just throw on a lens, hit the depth of field preview button and you know?
Well, yeah, but that can be a fiddle, and it’s not always such an accurate indication of what will be in focus in the final shot, when you consider you’re looking through a relatively tiny viewfinder which gets darkened down while depth of field preview is active (making it even more difficult to see exactly what’s in focus).
So what you may think is in focus is actually a blurred mess once it’s up on a computer monitor.
Of course, if you have the time to do so, and are shooting tethered, you can take some test shots, look at them on the monitor, and make adjustments until you get things just right, but this also takes time that you don’t always have available to you.
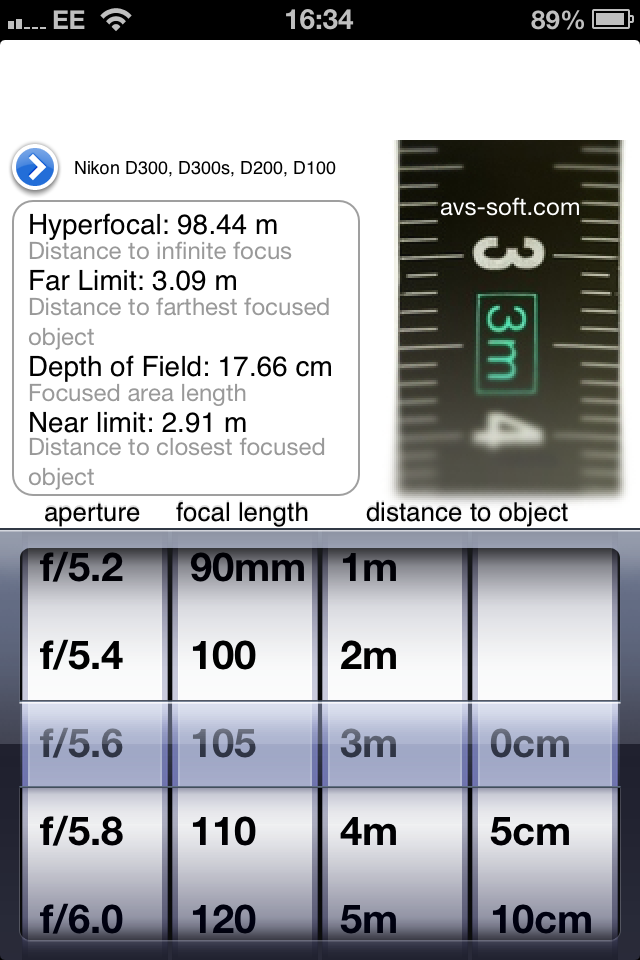 A depth of field calculator tells you exactly how much depth of field you should have with a specific focal length lens, on a camera with a sensor (or film plane) of a particular size, at a set distance from the subject at a given aperture.
This means you can figure out well in advance what you need.
If you know you’re going to be shooting outdoors, with a 105mm lens on a Nikon crop body, your subject’s eyes will be about 10ft (3m) away from you, and you want to keep their face in focus while still blurring the background, you can calculate that you probably want to be at about f/5.6 to give you enough depth of field to keep the entire face in focus, while still giving you the soft background you want.
 If you decide you want to get closer, say about 6ft from the subject’s eyes, for a tighter crop or headshot, with the same lens, your DOF calculator can tell you that you’d now need to be at f/11 or even smaller to get a similar depth of field that allows you to get the entire face sharp when focused on the eyes.
Personally, I use iDoF Calc, a free app from Apple’s app store. It’s also very handy when shooting landscapes, as it has hyperfocal distances listed for all focal lengths at different apertures.
Field Tools is another one I sometimes use, which performs a similar function, but offers a greater degree of control over focal lengths (handy if you’re shooting with zooms).
There are, of course, other depth of field calculators available for iOS, as well as for Android, but as iDoF Calc has worked so well for me over the past couple of years, I’ve not really looked into the others.
Exposure Value Calculator
While the maths of exposure compensation will eventually become second nature, when you have a million other things to think about, it can sometimes be handy having an extra tool there just to check your numbers and make sure that everything is as it should be, especially if you’re not getting the results you expected.
 If you’re looking to do a frame blend or HDR, where your aperture is going to remain constant from shot to shot for a consistent depth of field, your shutter speed will control the exposure.
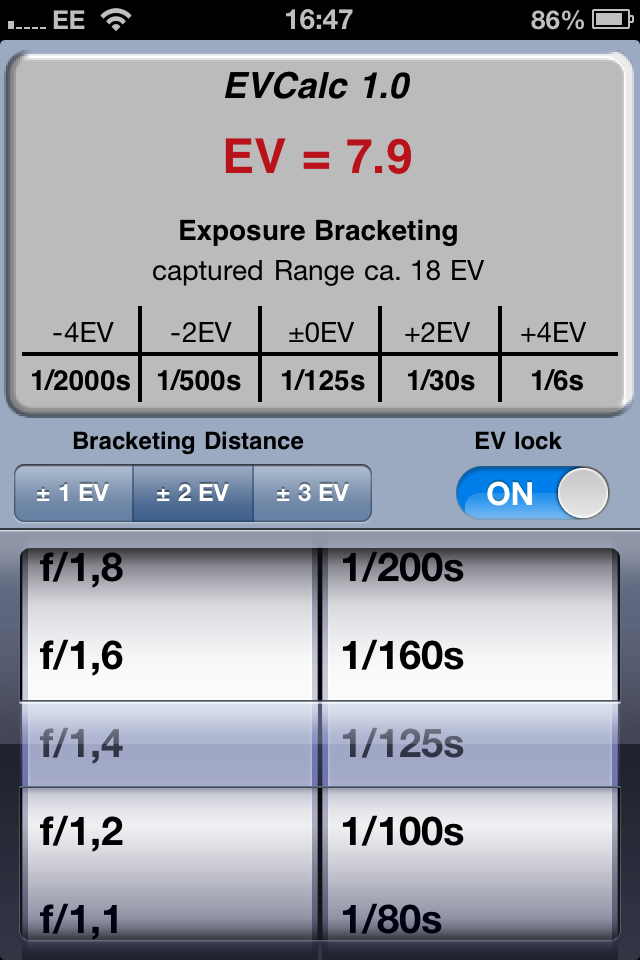
If you want to make sure all your shots are exactly 2 stops apart, so that you get -4, -2, 0, +2 and +4 EV shots for melding together later, such an app will give you those numbers quickly.
It can also be a handy reference if you’re shooting with filters over the lens. If you’re using a handheld incident light meter, which tells you to expose 1/320th of a second @ f/8 for your camera or film’s ISO/ASA rating to get a good exposure, and you’re using a polarising filter that’s going to knock off two stops of light entering your lens, then the EV calculator will tell you that you need to lengthen your shutter to 1/80th of a second to compensate and still get that good exposure.
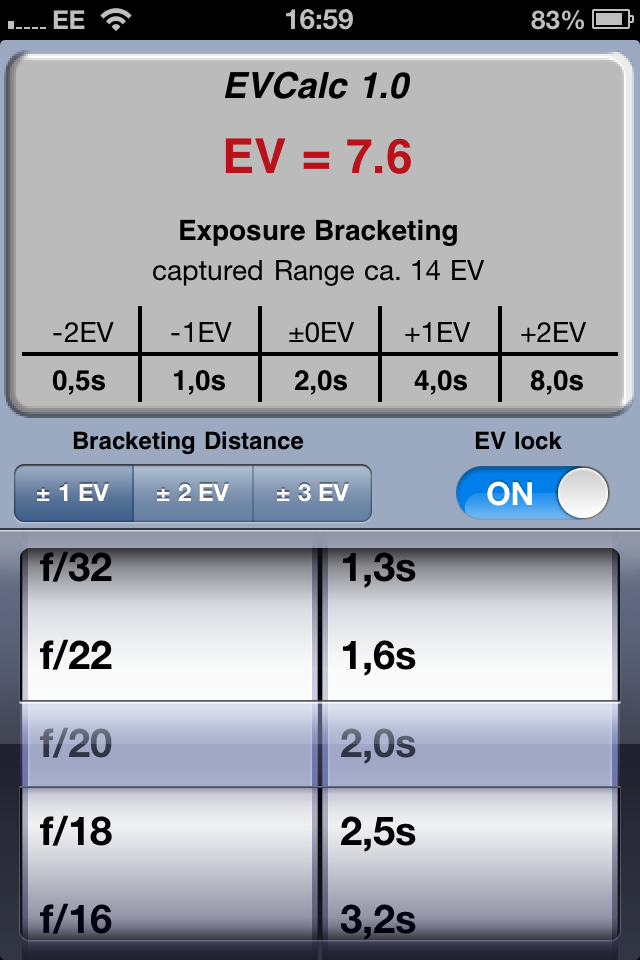 One great feature of the app I use is the “EV Lock” feature. So, let’s say I know I get a good shot at 1/125th of a second at f/1.4, but I want some more motion blur in my subject, and a bit more depth of field.
Dialing the aperture ring over from f/1.4 to f/20, giving me plenty of depth of field shows me that setting my shutter speed to 2 whole seconds will give me exactly the same exposure value.
There’ll be a lot more depth of field, and a lot of motion blur, but it will give me a good exposure.
Likewise, if you want to know how large your aperture needs to be in order to bump your shutter speed up to one suitable for hand holding, this app will allow you to find that out quickly and easily.
The app I use for this is EVCalc, although it appears to have been removed from Apple’s App Store since I installed it, which is a shame, as it works extremely well, however I’m sure there are many fine alternatives available.
Long Exposure Calculator
Are you noticing a theme here? Many of the photography related applications I use on my phone are calculators. There can be a lot of maths involved in photography, and when you actually need to know the maths (or at least need to know the answer), they can save a lot of time and hassle.
Long exposure calculators make life very simple if you like your rivers milky or want to turn a busy street scene into a blur of people motion.
For example, you setup your camera without filters on a nice sunny day in the middle of your local city centre. There’s a suitable amount of people walking through your shot in the directions you want them to walk, and your camera is telling you that to get a good exposure at the aperture you’ve chosen, you need to shoot at 1/2000th of a second.
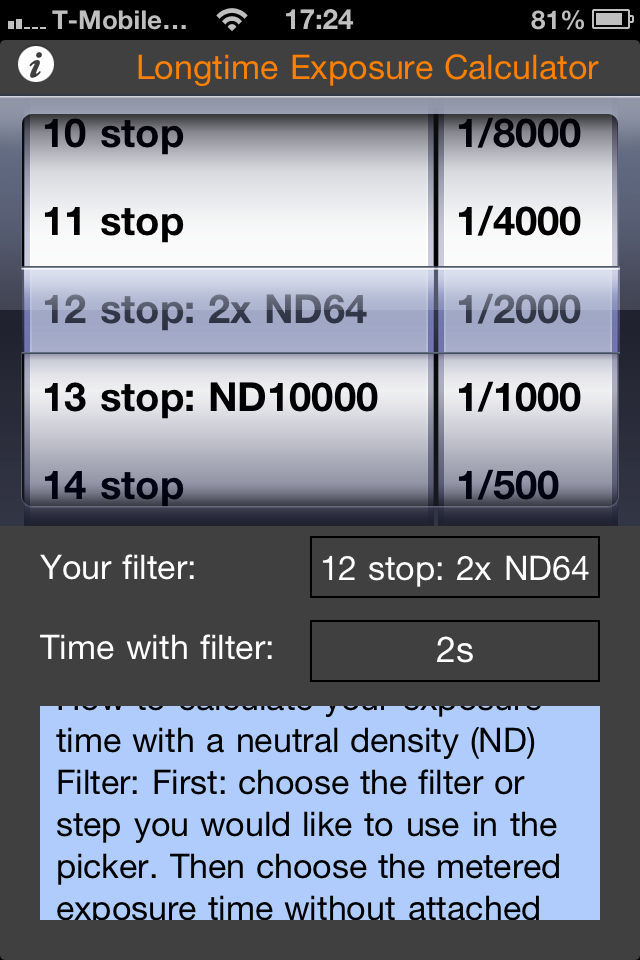 But that isn’t going to give you what you want. What you want is a whole 2 second exposure so that you can get some nice blur and motion, while the environment stays razor sharp.
So, you set your shutter speed to 1/2000th, and scroll down the ND list until you see 2 seconds in the final time.
In this case, that’s 12 stops. What you do with this information is up to you.
Depending on the filters you have available, you might choose to go with a 10 stop and 2 stop filter, or a pair of 6 stop filters, or three 4 stop filters.
Any of those combinations will give you the 12 stops required to bring your shutter speed to two seconds, but depending on the quality of the filters, the more you stack will generally mean a bigger loss in image quality and an increase in softness.
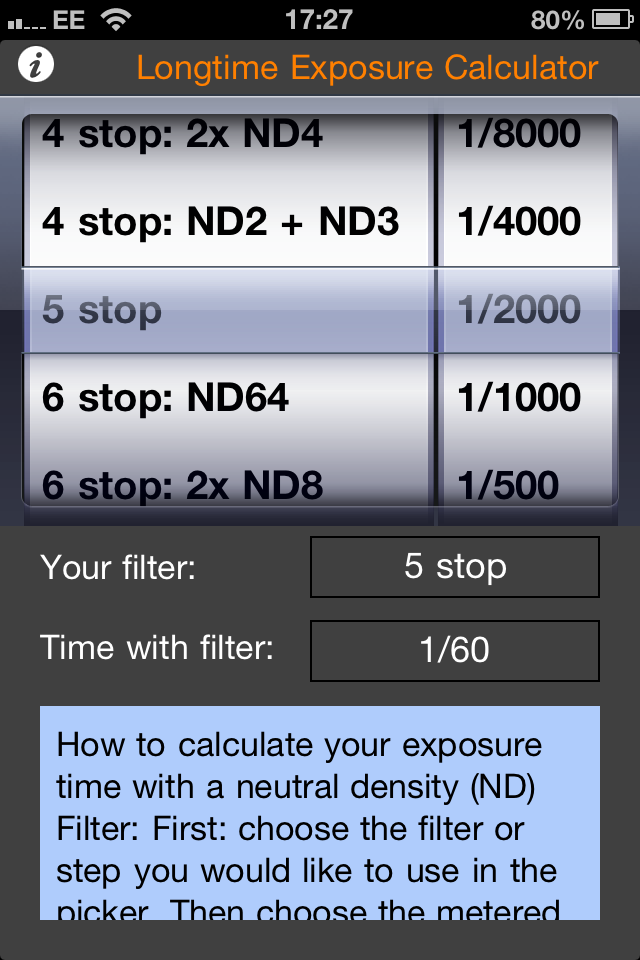 It’s also very handy for video. When you’re shooting video, you’re typically recording at 24, 25 or 30fps. This means you want shutter speeds of 1/50th or 1/60th of a second to get a fluid level of motion blur without the footage seeming too sharp or jerky.
In the same scenario as above, scrolling through the ND list tells you that you need 5 stops of ND in order to slow 1/2000th of a second down to 1/60th of a second.
Again, it’s maths that will eventually become second nature, but it sure helps to eliminate the guesswork and ensure you’re getting the results you expected.
The app I use is called Longtime Exposure Calculator and is available for free on the App Store.
Sun Scout
Now here’s one that isn’t a calculator, but extremely handy for shooting on location. This is an app I use most commonly when I’m location scouting (as its name might imply) for portrait sessions.
Sun Scout was free when I first acquired it, although it now appears to cost £7.99 in the UK App Store, and $9.99 in the US App Store, but it is worth every penny and would happily purchase it had I not already got it for free.
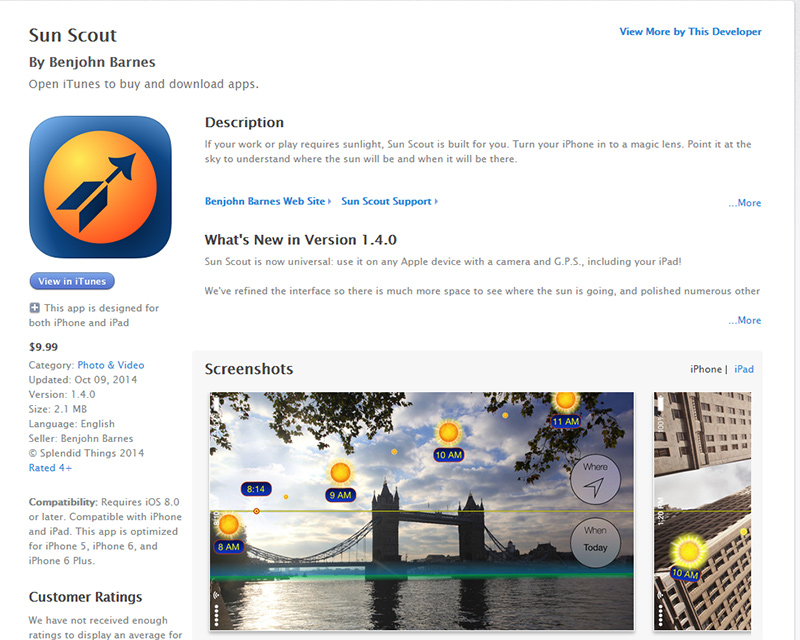
I typically scout locations several times before I decide to arrange a shoot there. Sun Scout allows me to see exactly where and when in the sky the sun is going to be throughout the day, so that I can plan sessions accordingly.
As well as allowing me to see how the sun will move throughout the current day, it will also let me see the sun’s path on any date of my choosing.
This means that if I know I have a shoot coming up at this location next Friday, while at the location I can enter next Friday’s date, hold my phone’s camera up to the horizon and see where and when the sun will rise and set, and every hour in between.
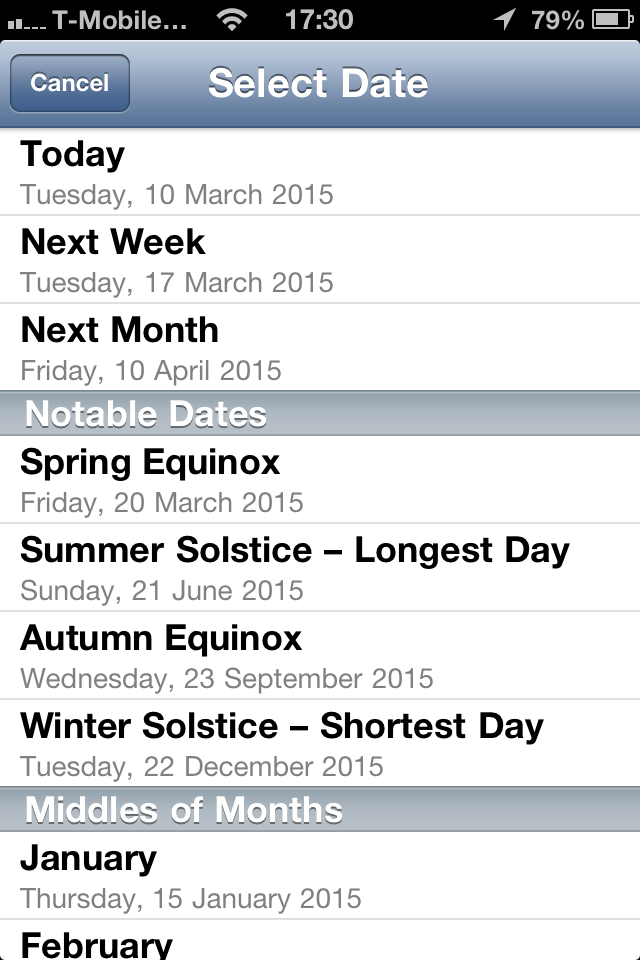 This is very useful if you spend the quiet months scouting for locations you want to shoot during the warmer and busier months (which could potentially be several months away).
Knowing in advance where the sun is going to be allows you to plan where you’re going to be shooting from, what direction you’re going to be shooting toward, what focal length you need to give you the field of view you want, and what supplemental lighting you might need to bring along to complement the natural light and your subject.
If it’s an early morning shoot, where my backdrop is something like the sunrise, I try, whenever possible, to camp out at the location overnight, which allows me to get my everything setup and ready to go the evening before. When I wake up, I just have to heat up the kettle and I’m ready for a nice relaxed morning’s shoot.
Sun Scout allows me to do this. I can setup my equipment well in advance and be confident that the sun is going to come up within my frame, without having to scramble around, fumbling for equipment in the dark, the instant I see the first hint of light coming over the horizon.
There are other apps out there for both the iPhone and Android phones which offer similar functionality, but, as above, this one works well for me, so I haven’t looked into others.
How Else?
As well as the apps mentioned above, there are various other applications which give me a time advantage when shooting, or allow me to be better organised while shooting on location.
The iPhone’s camera app (or one of the three million 3rd party camera applications – I prefer Camera+) will GPS tag any photos I make with the camera. While the photos the phone shoots may not necessarily be that amazing, the GPS tag during scouting missions allows me to see where they are on Google Maps and, more importantly, lets me find them again!
Other apps, such as RunKeeper (available for both iOS and Android), can perform a similar function. When I go location scouting, we’ll usually drive to a known spot, and then spend a couple of hours wandering around, just to see what we can find.
RunKeeper maps out our entire path, and allows me to see how long it took to walk from A (the car) to B (the location at which I want to shoot), which is important information to know when planning a shoot at a location, and you need to make sure gear or crew are at the location by a certain time.
A location that I used regularly throughout 2013 took about 10 minutes to walk to from the car, without equipment. With equipment it took about 20 minutes, as it was mostly uphill, and it required two people to take two trips each (and then we needed time to recover at the end of it all).
20 minutes there with gear, 10 minutes back without, two trips, that’s an hour’s solid walking, and then another half an hour to unpack gear, get it all ready to use, and 5 minutes for a coffee.
Suddenly that “10 minute walk” turned into 90 minutes. So, as I said, these things are important to know!
Combined with information from Sun Scout about where the sun is going to reside at any given point in the day (thus, when I want the shoot to happen), I know exactly how much time I need to allocate before a session to travel, and transport equipment.
The Notes app on my iPhone is also always used on shoots. A document in there contains all my emergency contact numbers for my family, as well as the local police, ambulance and, when appropriate, the local mountain rescue team. Shooting in the wilds of the Lake District, anything can happen! I make sure everybody involved in the shoot at the location gets a copy of these numbers.
Even the humble alarm clock is made use of during these shoots. If I know the light’s going to be optimal until a certain time, I set an alarm for 10 minutes before that time to let me know to get a move on if I haven’t yet got what I needed. Or, if I’m waiting for an important event (like sunrise), again I’ll set an alarm a few minutes in advance to let me know I need to get ready.
It also allows me to maintain a schedule throughout the day. When to wrap up the current set and move on to the next, when to start packing up, when to put the kettle on and get coffee going, etc.
I’m sure there’s a thousand other uses for the iPhone on a shoot that I’m either forgetting or have not yet discovered, but those will be for another post. For now, this one’s gone on long enough.
So, don’t think of your smartphone as just a way to tweet out behind the scenes photos (although, that’s cool, too). It can become a valuable and vital tool in your shoot workflow if you want it to be.